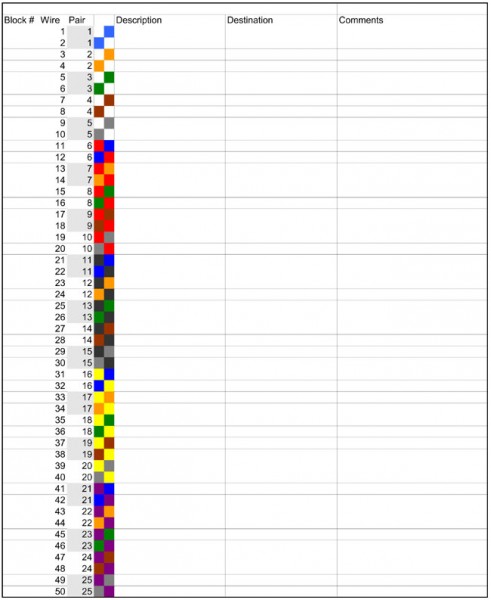
There are a myriad of details involved in building a studio, not to mention an entire facility. Getting everything down on paper before a single wire is pulled is one way to ensure that a neat, logical, and orderly product ensues. For wire run documentation, I like to use Excel spreadsheet templates that I came up with.
There are several different types of cable, from 25-pair ATT style to 16 or 24-pair shielded audio cable, to miscellaneous control cable, all of it has different color codes. I found the Belden Technical info website to be an excellent source for various color codes.
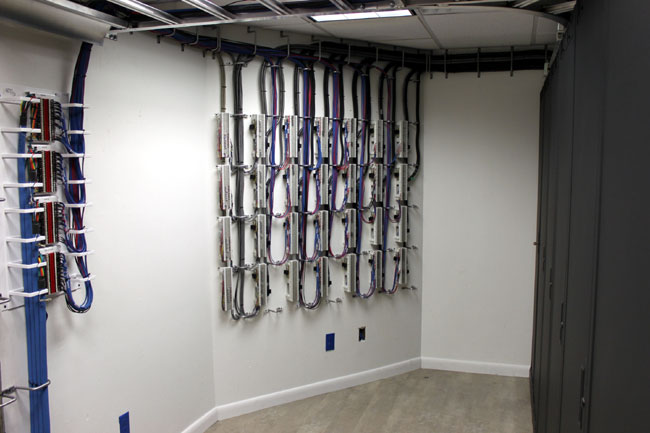
Doing neat work is the best way to keep things in order. Notice all the wires are labeled. All the ground conductors have heat shrink, which is required on insulation displacement terminations like 66 blocks, 110 blocks, and ICON terminations.
ADC ICON termination block
Once all the work is done, the wire run sheets are updated with changes and additions (there are always changes and additions) which will keep the documentation accurate.
I made up several templates with the wire color code, pair number, and cable information on each wire. This allows the wire man to quickly enter changes to the wire information on the sheet. At the end of the wiring project, these forms can be saved in several places, printed out, and placed in a book or however, the engineering manager wants to keep the information.
For 16/24 pair Gepco cable on ADC ICON Termination blocks, click here.
I say Gepco cable, any audio cable that is color coded with standard resistor color codes will work with these sheets, or the sheets can be adapted for use with other cables.
66 blocks audio and control for nextgen installation
This is a good installation. The company I work for has several wiremen that are artists and do excellent work. Notice there is adequate room and light to work on the wall. A dark, cramped area will lead to hurried work, poor workmanship, and mistakes in wiring.
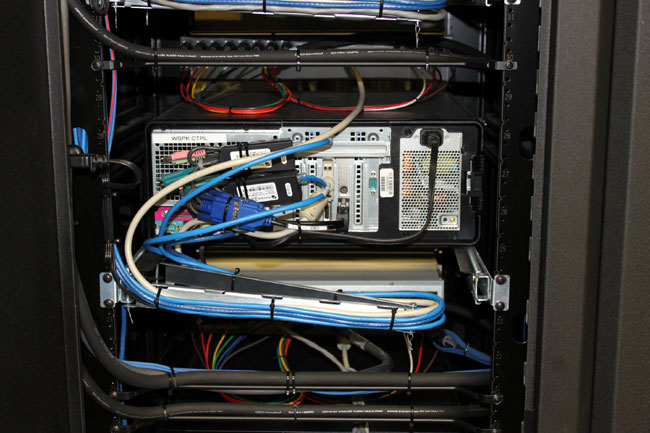
Automation computer on slide-out rack with cable management system
All the cables to the rack mount computers are neatly dressed, which allows easier service.
Old world and all that. I am of the impression that European broadcast engineers are a more studied lot. Their process involves much more deliberation, thoughtful analysis, and planning than ours does. For example, when it comes to station loudness, most programmers and many engineers (myself not included) to do more is better. It is thus that we get the Omina 11 and other audio squashers.
EBU R128 (ed: Loudness Recommendation) is the result of two years of intense work by the audio experts in the EBU PLOUD Group
Aside from the above-mentioned EBU R128, there are four technical papers dealing with implementation, meters, distribution, and so on. The body of work is a recommendation, not a requirement. I can’t imagine the voluntary implementation of something like this in the US. Even so, there are advantages to having a single acceptable level of programming audio. It is interesting reading.
Computer audio sound cards are the norm at nearly all radio stations. I often wonder, am I using the best audio quality sound card? There are some trade-offs on the quality vs. cost curve. At the expensive end of the curve, one can spend a lot of money on an excellent sound card. The question is, is it worth it? The laws of diminishing returns state: No. High-quality reproduction audio can be obtained for a reasonable price. The one possible exception to that rule would be production studios, especially where music mix-downs occur.
I would establish the basic requirement for a professional sound card is balanced audio in and out, either analog, digital, or preferably, both. Almost all sound cards work on PCI bus architecture, some are available with PCMCIA (laptop) or USB. For permanent installations, an internal PCI bus card is preferred.
Keeping an apples: apples comparison, this comparison it limited to PCI bus, stereo input/output, and analog and digital balanced audio units for general use. Manufacturers of these cards often have other units with a higher number of input/output combinations if that is desired. There are several cards to choose from:
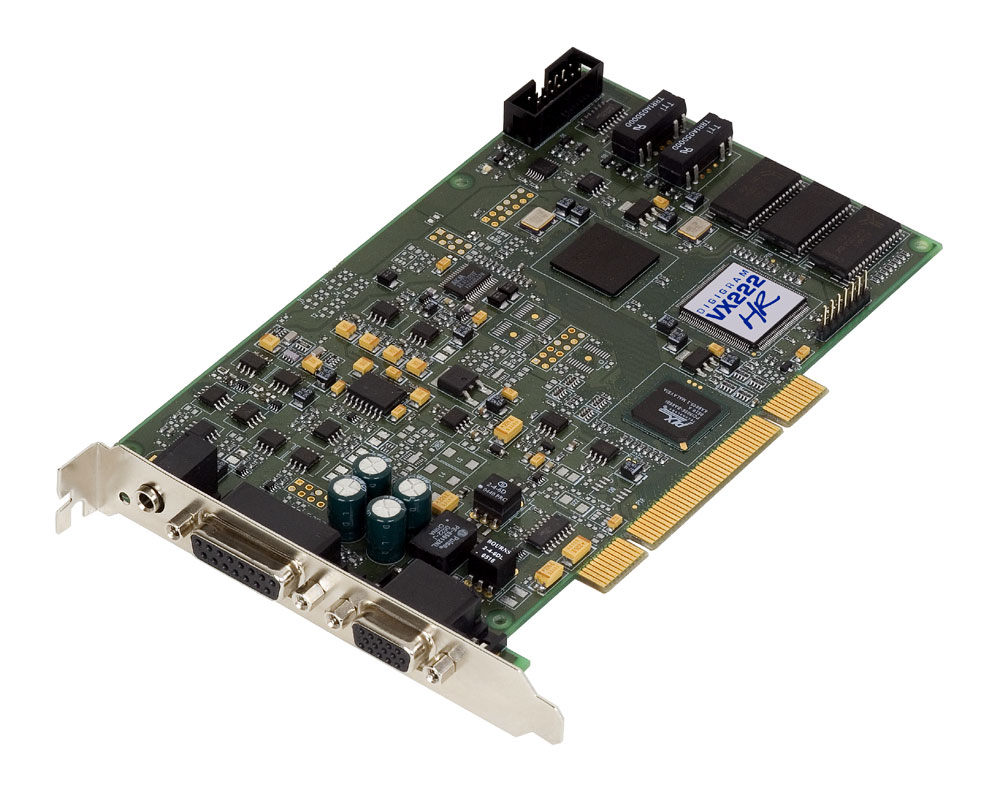
The first and preferred general all-around sound card that I use is the Digigram VX222HR series. This is a mid-price range PCI card, running about $525.00 per copy.
Digigram VX222HR professional sound card
These are the cards preferred by BE Audiovault, ENCO, and others. I have found them to be easy to install with copious documentation and driver downloads available online. The VX series cards are available in 2, 4, 8, or 12 input/output configurations. The HR suffix stands for “High Resolution,” which indicates a 192 KHz sample rate. This card is capable of generating baseband composite audio, including RDS and subcarriers, with a program like Breakaway Broadcast.
Quick Specs:
2/2 balanced analog and digital AES/EBU I/Os
A comprehensive set of drivers: driver for the Digigram SDK, as well as low-latency WDM DirectSound, ASIO, and Wave drivers
32-bit/66 MHz PCI Master mode, PCI and PCI-X compatible interface
24-bit/192 kHz converters
LTC input and inter-board Sync
Windows 2003 server, 2008 server, Seven, Eight, Vista, XP (32 and 64 bit), ALSA (Linux)
Hardware SRC on AES input and separate AES sync input (available on special request)
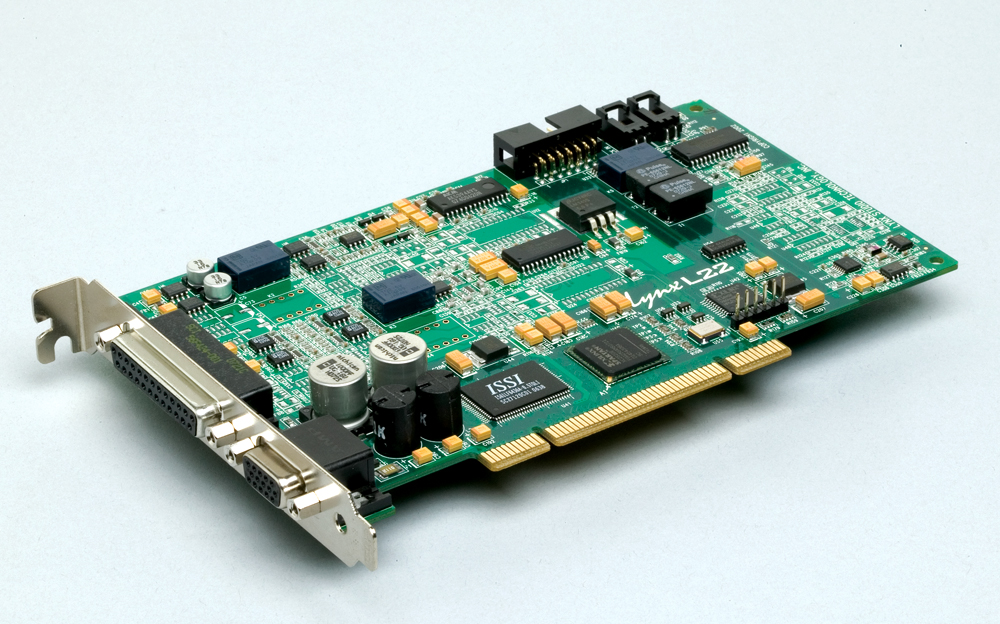
Next is the Lynx L22-PCI. This card comes with a rudimentary 16-channel mixer program. I have found them to be durable and slightly more flexible than the Digigram cards. They run about $670.00 each. Again, capable of a 192 KHz sample rate on the analog input/outputs. Like Digigram, Lynx has several other sound cards with multiple inputs/outputs which are appropriate for broadcast applications.
Lynx L22-PCI professional sound card
Specifications:
200kHz sample rate / 100kHz analog bandwidth (Supported with all drivers)
Two 24-bit balanced analog inputs and outputs
+4dBu or -10dBV line levels selectable per channel pair
24-bit AES3 or S/PDIF I/O with full status and subcode support
Sample rate conversion on digital input
Non-audio digital I/O support for Dolby Digital® and HDCD
32-channel / 32-bit digital mixer with 16 sub outputs
Multiple dither algorithms per channel
Word, 256 Word, 13.5MHz or 27MHz clock sync
The extremely low-jitter tunable sample clock generator
Dedicated clock frequency diagnostic hardware
Multiple-board audio data routing and sync
Two LStream™ ports support 8 additional I/O channels each
Compatible with LStream modules for ADAT and AES/EBU standards
Optional LStream Expansion Module LS-AES: provides eight-channel 24-bit/96kHz AES/EBU or S/PDIF digital I/O (Internal)
Audio Science makes several different sound cards, which are used in BSI and others in automation systems. These cards run about $675 each.
Audio Science ASI 5020 professional sound card
Specifications:
6 stereo streams of playback into 2 stereo outputs
4 stereo streams of record from 2 stereo inputs
PCM format with sample rates to 192kHz
Balanced stereo analog I/O with levels to +24dBu
24bit ADC and DAC with 110dB DNR and 0.0015% THD+N
SoundGuard™ transient voltage suppression on all I/O
Short length PCI format (6.6 inches/168mm)
Up to 4 cards in one system
Windows 2000, XP and Linux software drivers available.
There are several other cards and card manufactures which do not use balanced audio. These cards can be used with caution, but it is not recommended in high RF environments like transmitter sites or studios located at transmitter sites. Appropriate measures for converting audio from balanced to unbalanced must be observed.
Further, there are many ethersound systems coming into the product pipeline which convert audio directly to TCP/IP for routing over an ethernet 802.x based network. These systems are coming down in price and are being looked at more favorably by broadcast groups. This is the future of broadcast audio.
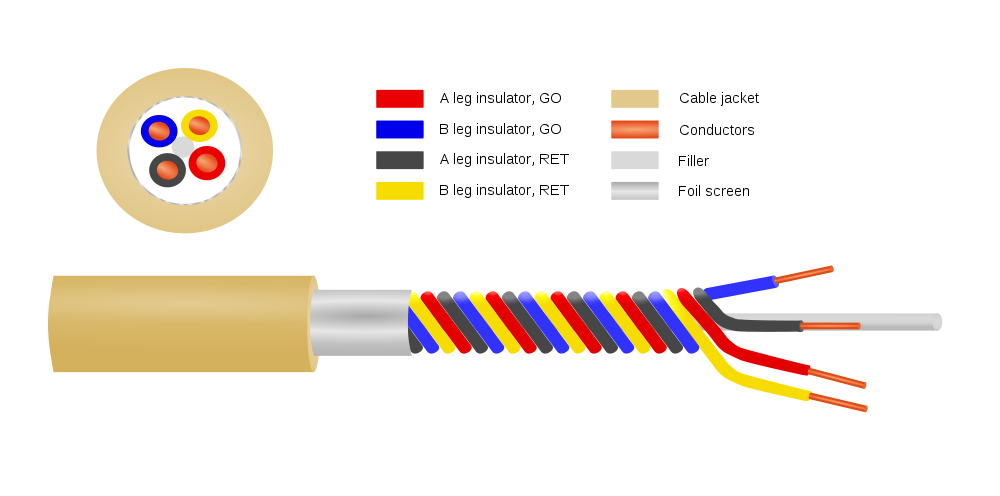
Or Star Quad Microphone Cable, depending on who is making it.
Star Quad Microphone Cable Diagram
This has been around for quite a while, but many studio/broadcast engineers don’t understand it or don’t use it for some reason. Microphones and mic pickups produce relatively low signals when compared to line-level audio. Most microphone preamps have a gain of +50 dB, which means any noise gets amplified and even small things can become major problems quickly.
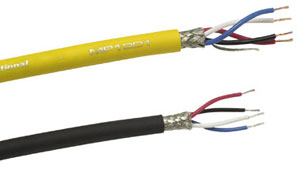
Gepco MP1201 Quadstar Microphone Cable
Under general conditions, most balanced shield twisted pair (STP) audio cable such as the standard Belden 8450 is adequate for stationary microphone cable for short runs. When the cable is not permanently fixed in place, as in hand-held microphones, microphones mounted on booms, or other nonfixed microphone applications, then a flexible cable must be used. Star Quad cable has better noise specifications than standard flexible microphone cable.
The advantage of Star Quad cable for low-impedance microphones (150 ohms) is that the parallel twisted pairs significantly reduce inductive reactance. In AC circuits, inductive reactance acts as a low pass filter, gradually rolling off as the frequency is increased. This effect is cumulative, the longer the cable run, the more inductive reactance is added to the circuit. The result is microphone audio can have smeared or ill defined high frequency audio.
parallel inductance formula
Using two parallel twisted pairs is similar to parallel resistors when it dealing with inductive reactance, it halves the value.
In addition to reducing inductive reactance, the tighter twist found in Star Quad cables reduces the CMRR by about 20 dB. The Star-Quad configuration keeps the conductors in the same relative position to each other as the cable is flexed and moved around. All of this makes it superior to standard STP microphone cable.
Several companies manufacture Quad Star cables:
Belden: 1192A
Canare: L-4E6S
Gepco: MP1201
Mogami W2534
Cardas 4X24
The price of Star Quad cables runs about 40-60 cents per foot (more for the Belden, much more for Cardas) if purchased in bulk. That is about the same range for two conductor mic cables.
As good as this cable is, I don’t think they had this in mind when they made it:
I wonder what the centripetal force on that cable is when the microphone is in full motion. Also, I’d bet that SM58 was none the worse for were after it’s crowd surfing moment.