Ground Conductivity

An important part of any medium-frequency and high-frequency antenna system is the nature of the ground immediately around the antenna system. The reason for the complex and expensive AM ground system is to create a return path for the portion of the RF wave that is not radiating from the tower. Higher ground conductivity helps this process greatly. The higher the ground conductivity, the more efficient the antenna will be.

Ground permittivity is relative to that of free space which is 1. In general, it is a measurement of how much polarization of the ground material occurs in the presence of an electric field. Relative permittivity is a unit-less number indicating the dielectric constant. It is an important factor in ground wave propagation modes like daytime AM radio. Lower frequencies have greater depth of ground penetration and permittivity goes up. That is why low dial position AM stations have better daytime ground wave coverage per kilowatt then the high dial position stations.
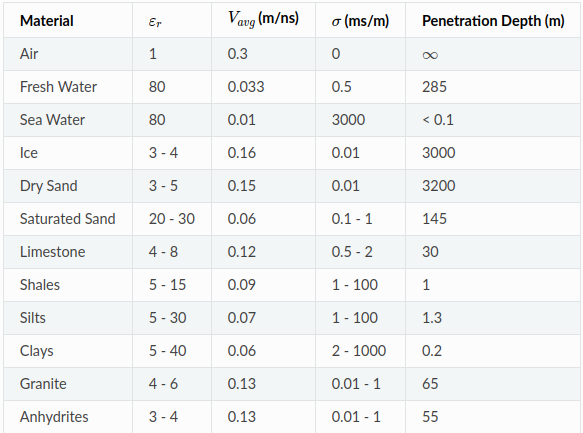
Estimated relative ground permittivity by composition, Courtesy of em.geosci

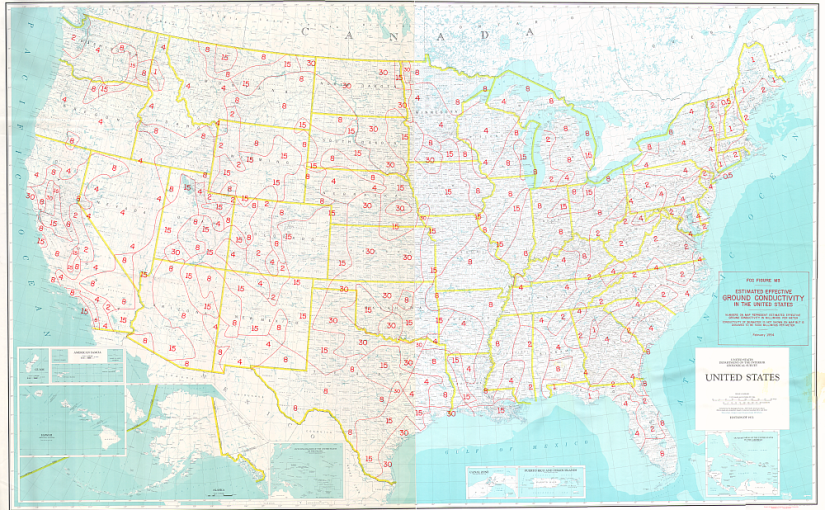
According to the FCC M3 map, the ground in this general area is supposed to average 4 milliMhos per meter (milliMho is equivalent to a milliSiemen). This is a very rough estimate as conductivity can vary greatly within short distances and can change depending on soil moisture. This is the reason why many AM transmitter sites were built in swamp land. Wet soil has higher conductivity and permittivity. Plus, the land was cheaper.
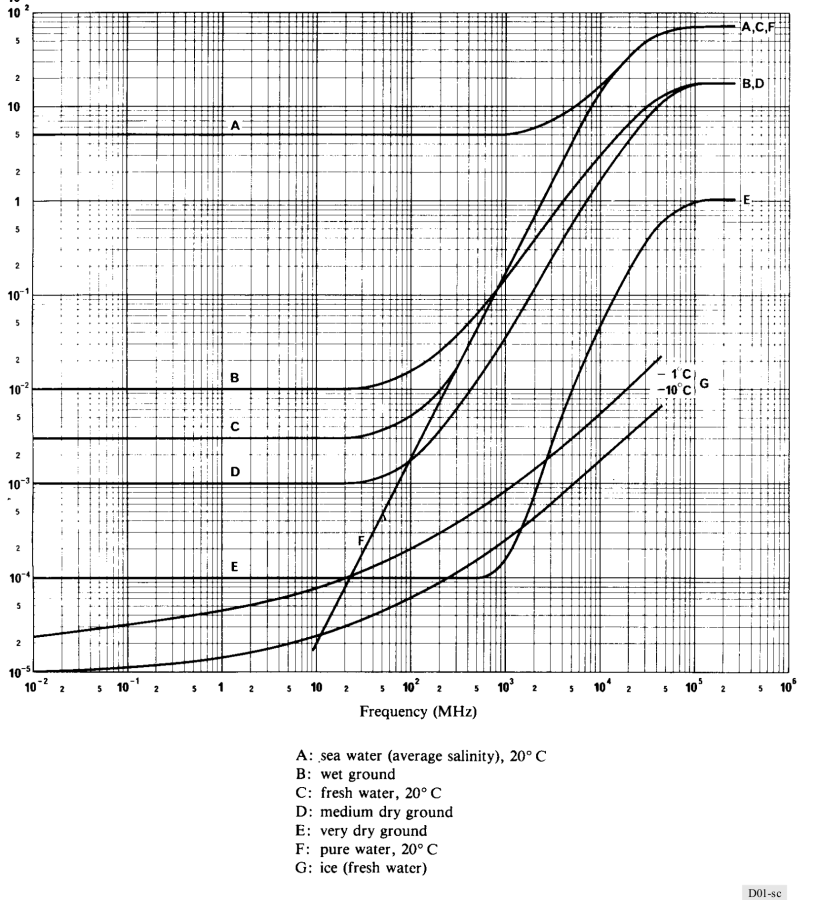
Estimated ground conductivity by frequency and moisture, ITU recommendation P.527.3

When modeling antennas with NEC, particularly vertical antennas, the ground conductivity plays a significant part in the antenna performance. At lower frequencies, the permittivity (aka dielectric constant) also plays a role. Having actual numbers instead of the FCC estimate gives a better overall model of the antenna.

All of this made me think about how to obtain better data. Fortunately, a radio amateur (Rudy Severns, N6LF, Hardy Lau, DL1GLH and Tobias Wellnitz, DH1TW) have thoroughly documented a good procedure. This is termed “Open Wire Line” method, which uses two metal probes that are the end of an Open Wire transmission line. A VNA is then connected to the probes and the complex impedance is measured. The resistance and reactance are then plotted along with the physical aspects of the probes to calculate conductivity and permittivity. More information can be found at How to measure Ground Conductivity by Tobias, DH1TW.
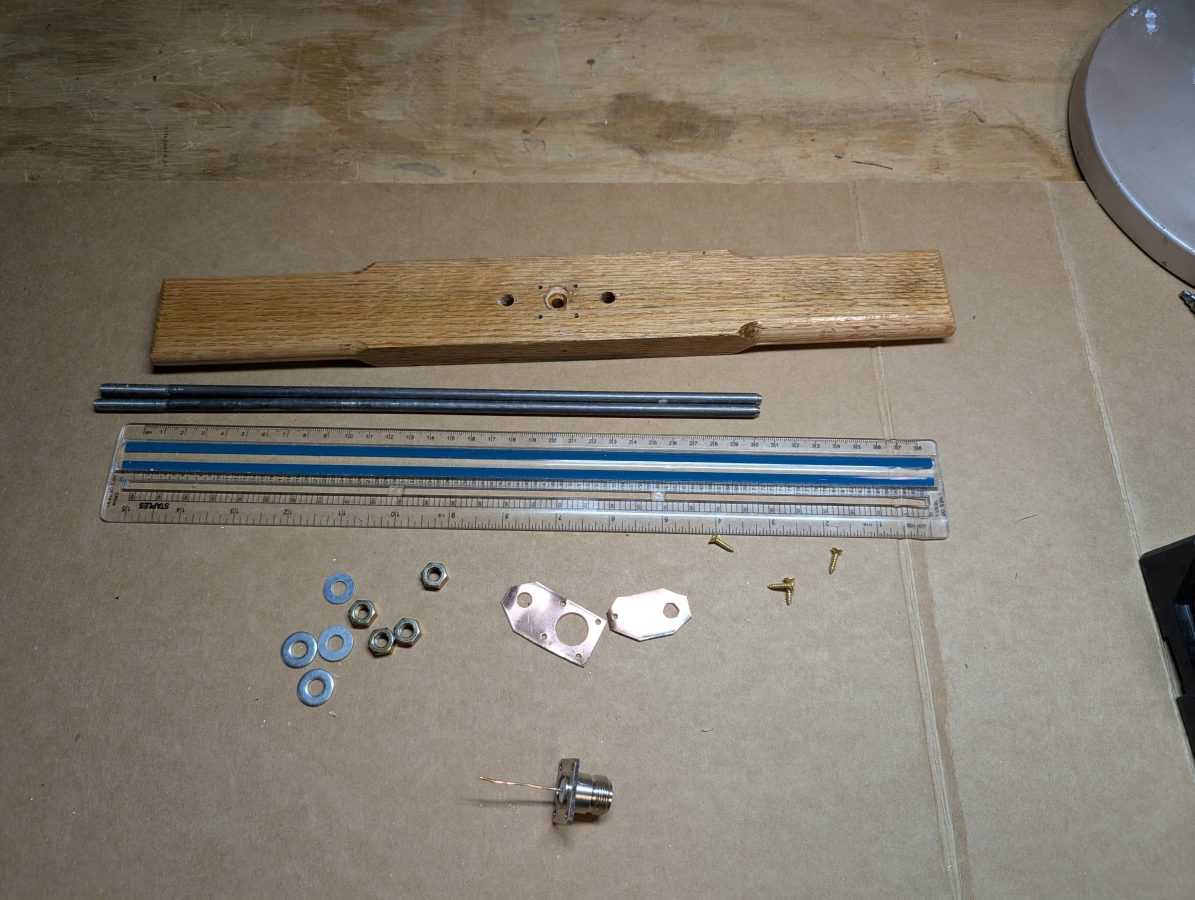
Ground conductivity probe parts

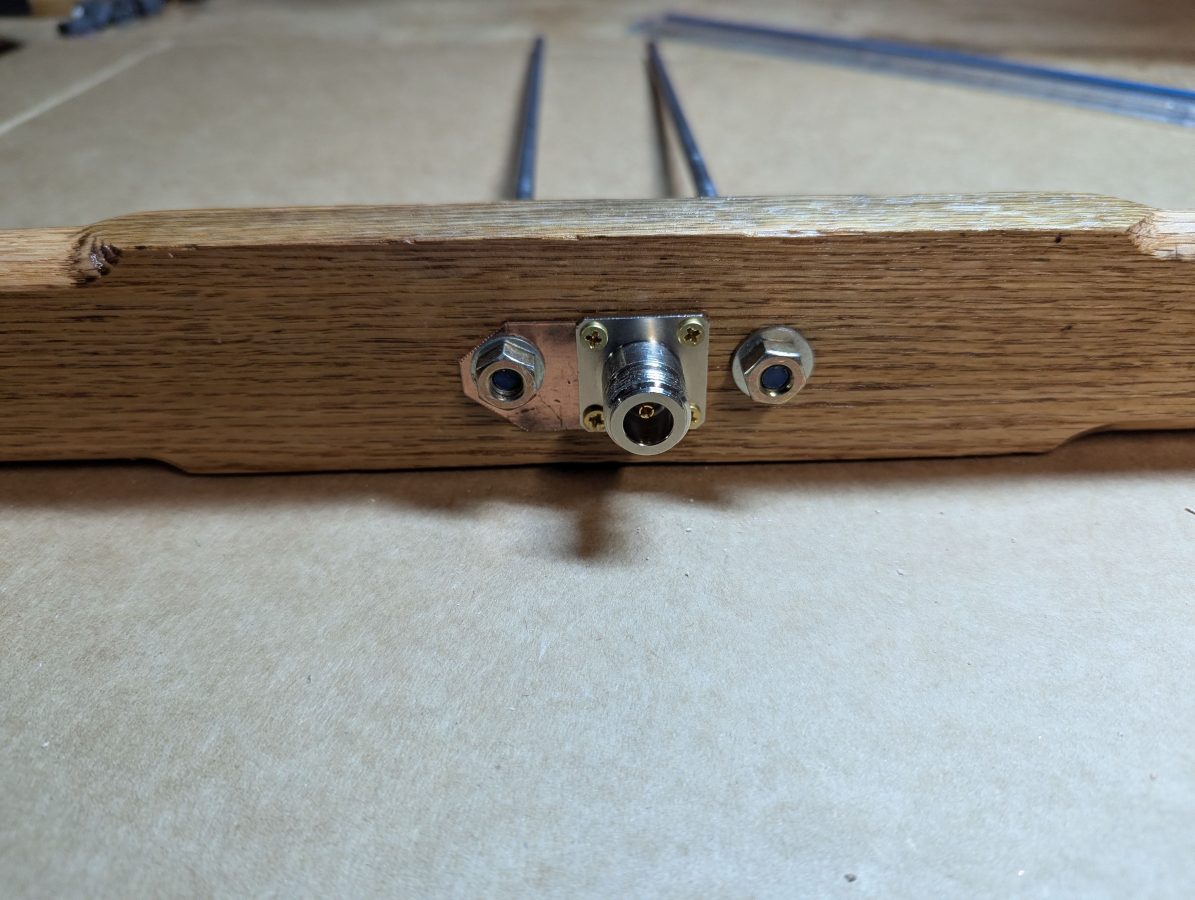
Once again, I took stock of what I had laying around and found a pretty good way to make a ground conductivity probe. The first thing is to make an insulated holder/handle for the two metal probes. I have a large selection of oak planks, which have been used for many projects in the past. In this case, a small piece of 1 x 2 was cut down to 16 inches. I then used the router to round off the edges and laid out the holes for the probes and N connector. I finished the oak with several coats of polyurethane to keep moisture out of the wood grain. I purchased a three foot piece of 1/4 inch (6.35 mm) mild steel round stock, which I cut in half. Using a 1/4 28 die, I threaded one end of each piece so I could attach it to the oak handle. The probes are spaced 50 mm apart and are 300 mm long. The steel probes were connected to the N connector with two pieces of copper strap.

NameQuantityUseCostComment
Oak 1 x 2″`1Handle$0Left over
1/4 x 36″ steel round stock1300 mm probes$6.99Home Depot
1/4 28 nuts4Attach probe to handle$3.99Home Depot
N Female Connector1RF input$0Salvaged
Copper Strap5 inchesConnect probes to RF input$0Left Over
Ground conductivity measuring probe

The land around my house was farm land for a long time. First field crops then a grazing pasture for a dairy farm. The last farming activity was about 65 years ago, since then the trees have grown in. The soil itself is mostly glacial till; rocks, sand and clay. I do not expect much.

I headed into the woods with my Siglent network analyzer and measure the ground conductance. I then saved that information as a .csv.
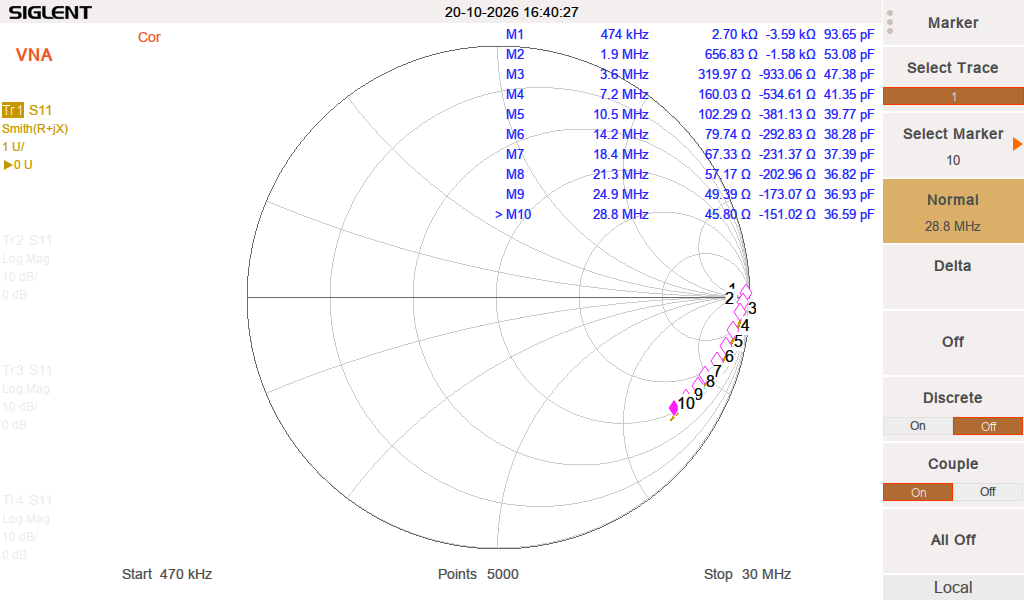
Amateur Bands OWL measurements

I have since saved my ground conductivity sweep profile in the analyzer. I reduced the points down to 180, which gives at least one point in every amateur band from 630 through 10 meters. That makes the marker settings redundant and .csv output much more manageable. I have another sweep profile for just the AM Broadcast band, this one runs from 530 – 1,710 KHz and has 118 points, which provides a measurement on every carrier frequency.

I sent the .csv into ChatGPT and had it analyze the data. When it comes to AI, it is all about the prompt. The more information and instruction provided, the better the output will be, usually.

The ChatGPT prompt:

Calculate the ground RF conductivity and permittivity using the open wire line method. Measurements are made with a Vector Network Analyzer using S11, data is Real/Imaginary, ground measurement probe consists of two steel rods, 6.35 mm in diameter, 300 mm long, spaced 50 mm. The rods are fully inserted into the ground. Include probe end fringing and steel conductor losses. Show all math and proof for the first frequency only. Use this data: cgmfhf1.csv

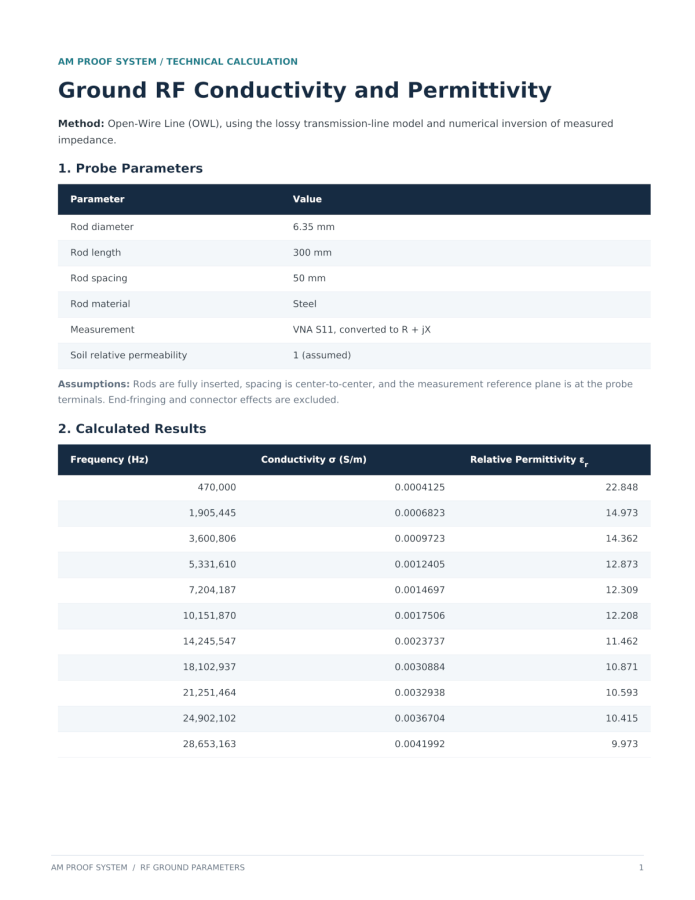
I have found a need to be careful with any AI. ChatGPT tends to be over optimistic. My first attempt, the output had a ground conductivity of 12 mS/m which looked great until I dug a little deeper. It seems ChatGPT copied the answers from DH1TW’s blog post. When I ran the numbers myself, it was more like 1 mS/m. I scolded that lazy AI and told it to do it again, this time with the proof. That is why I want to see the math for the first frequency. Here is a chart with the ground conductivity and permittivity in my antenna field for the MF and HF amateur frequencies:
Here is the math for the first frequency:
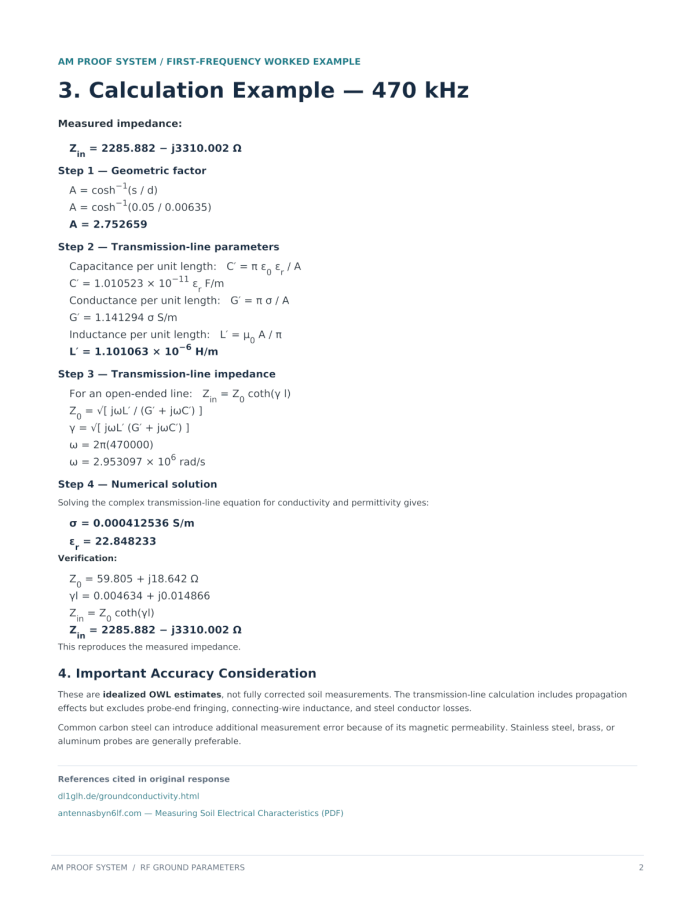
I always ask to see the math for the first frequency so I can check the AI’s work and make sure that it is not being lazy again.

Running some models in MANNA-GAL and I feel like the results are much more similar to what I am seeing WSPR beacon.
The Ultimate Receive Antenna

This post is about a Large Loop On Ground (LLOG) receive antenna.

I have, for some time, been lamenting the demise of my K9AY antenna last year. While I don’t spend a lot of time Shortwave Listening these days, it is sometimes a nice diversion on a rainy day.

I have been reading about LOG (Loop on Ground) broadband receive antennas for a few years and the concept sounds interesting. Loop antennas in general, tend to reject RF noise better than dipole or vertical ground plane type receivers.

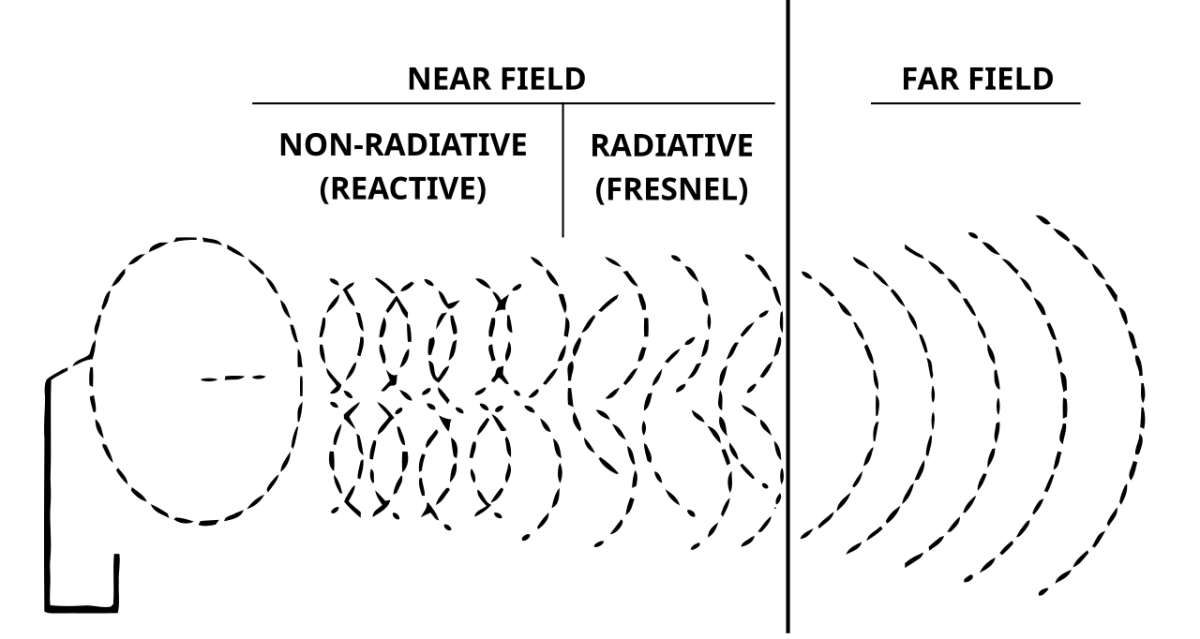
The idea is the loop antennas are more H field (magnetic) than E field (electrical) receivers. Most unintentional RF noise generators create noise in the E field.

Near Field vs. Far Field Electro-Magnetic energy

Additionally, close proximity to the ground further lowers E field noise due to capacitive coupling with the ground. The ground acting as a sink for the E field noise. Loops also tend to have better rejection of chaotic Near Field energy. Thus the combination of those three things will create slightly lower signal with much better signal to noise ratios over traditional up in the air antennas.

The downside is that it cannot be used for transmitting. The capacitive coupling noted above will quickly dissipate all of the transmitted RF into ground as heat.

The LOG antenna that most amateur radio operators use is either or close to the antenna outlined by Matt, KK4JY: The Loop on Ground Antenna

That is all well and good, but I want something larger to go down through the entire Medium Frequency band in into Low Frequency range. The main reason is I want to start fooling around with the 2200 and 630 meter amateur radio bands. Also, wanting a good low noise AM broadcast receive antenna. With that in mind, I began taking inventory of available real estate and parts.

As for real estate; I own a patch of woods behind my house that is approximately 200 x 200 feet. Good enough for a fairly large square loop. The good thing about particular plot of land is it is far away from the neighbors, the utility lines and other sources of electrical noise.

As for the available parts; it turns out I had almost everything needed. The only thing I needed to purchase is a water tight outdoor enclosure for the matching transformer, from Amazon for $9.00.

Here is a list of items used:

ItemAmountUseCommentCost if new
Wire, 14 AWG470 feet (143.26 M)Wire LoopPieced together from left overs$100.00 (500 ft spool) at Home Depot
Toroid, BN-73-2021Transformer coreLeft over$0.95 at Amidon
Wire, 26 AWG magnet wire18 inches (46 cm)Transformer windingLeft over$9.00 (2 oz) at Amazon
Coax Cable, Cablewave FCC38-50J175 feet (53.34 M)Transmission line to houseSalvaged from decommissioned AM directional$53.00 (500 ft spool RG-6) at Home Depot
RF Connector, type N Female1Antenna outputFound in junk drawer$6.00 (6ea) F chassis mount at Amazon
Enclosure, ABS water tight IP673.9 x 3.9 x 3 inch
(9.9 x 9.9 x 7.62 cm)
Transformer housingPurchased from Amazon$9.00 at Amazon

The wire is copper THHN 14 gauge. If buying new, this is the single largest expense. I soldered and heat shrunk several lengths from left overs on spools. This antenna is going to be in the shade, so I don’t have to worry too much about UV degradation of the insulation. If that happens, I can find some more insulated wire.

The big bonus is the Cablewave FCC38-50J phase stabilized cable, most of which is buried out to my old K9AY antenna, I simply extended it about 50 feet. Having the line already buried to much of the manual labor out of the project. The buried section of line acts as an RF choke, fully eliminating any electrical noise coming from my house at the antenna side of the line.

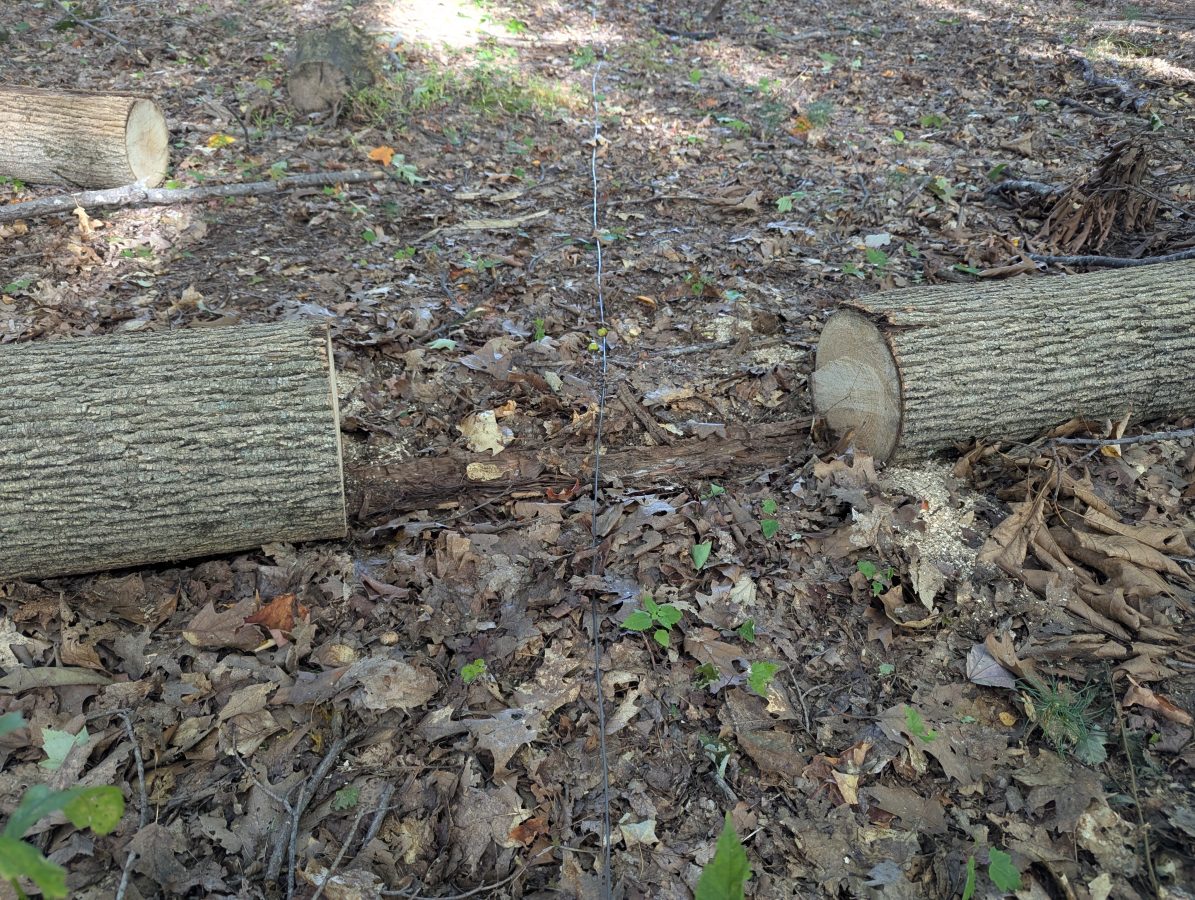
Large Loop On Ground antenna, installed in woods behind my house

I did have to go around and clear away some brush and dead trees along where the antenna wire was laid on the ground. I wanted to make sure that the wire was directly on or within an inch or two of the ground.

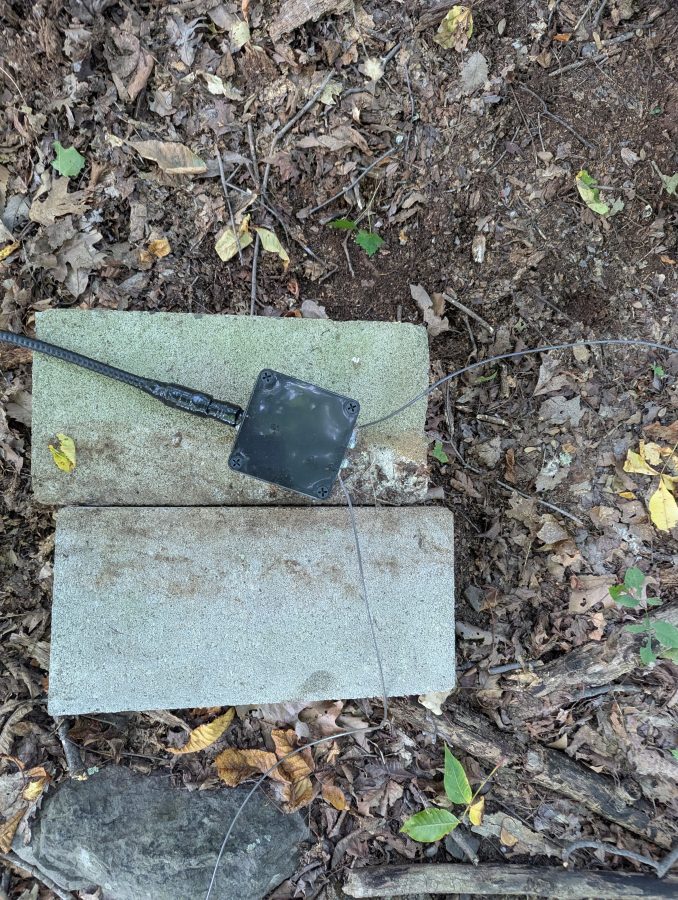
LLOG antenna transformer and transmission line

The transformer took about 20 minutes to construct. It consists of six windings on the antenna side and two windings on the transmission line side. I used a type 73 core because I am more interested in the medium frequency range. It seems to work well up to about 15 MHz. The transformer is for galvanic isolation, keeping the loop current balanced and separated from the transmission line. The shield is not grounded at the antenna side, but is grounded where it comes into the house. On the transformer enclosure, I used a salvaged N connector to match what I had for the transmission line. Any low loss cable, including RG-6 or RG-11 will work very well.

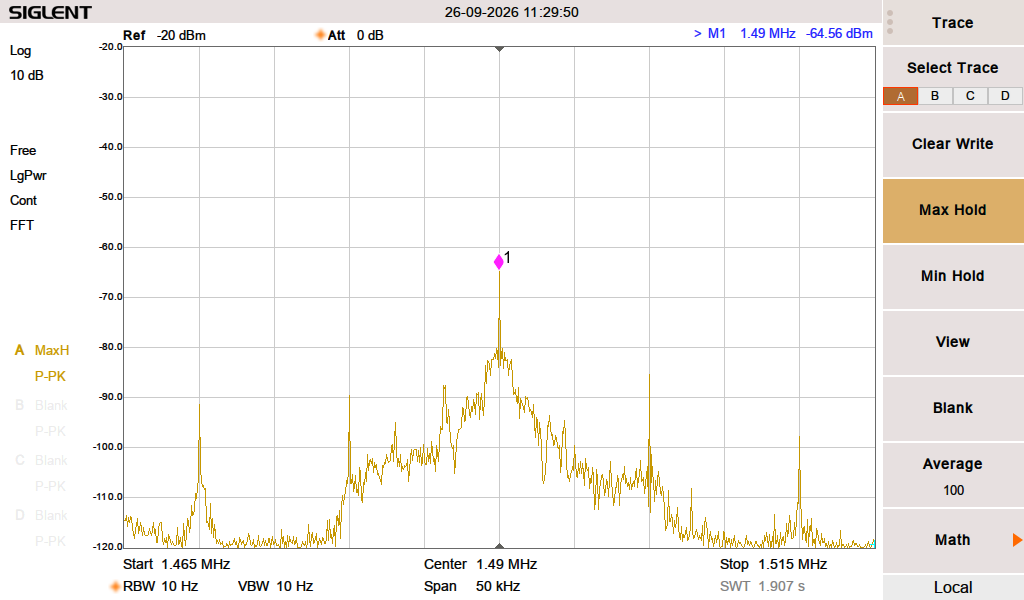
WKNY signal, 18 miles distant from transmitter

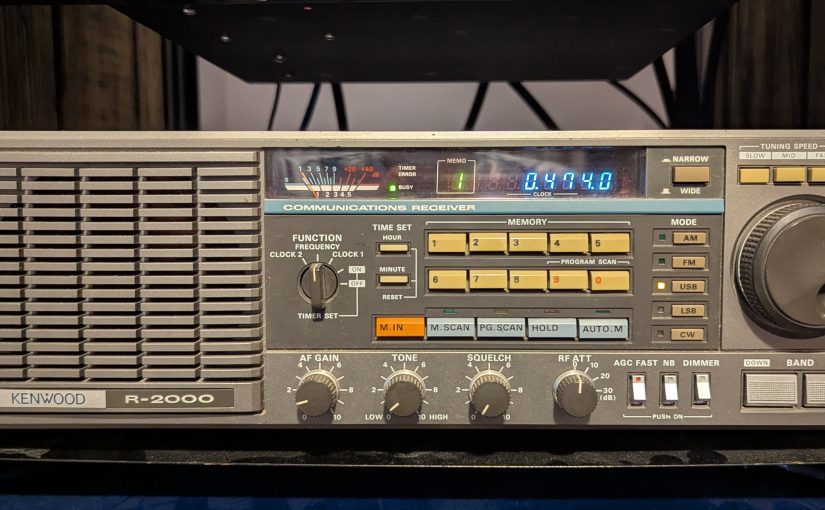
After a few hours of low intensity work, I had everything together. I connected the antenna to my trusty Kenwood R-2000 receiver and tuned to the nearest Class C AM on 1,490 KHz. Wow! What a difference! This little 1 KW high band station 18.6 miles (30 km) away barely came in before, especially when the ground is dried out. The relative signal strength meter on the receiver shows an S9+5. I am located on the edge of the predicted 0.5 mV/M contour while the spectrum analyzer shows a -65 dB signal, which is netting a 44 dB SNR, which is very good. All of this is after a Mini Circuits ZSC-4-2 power divider, which has an insertion loss of -6 dB per port.

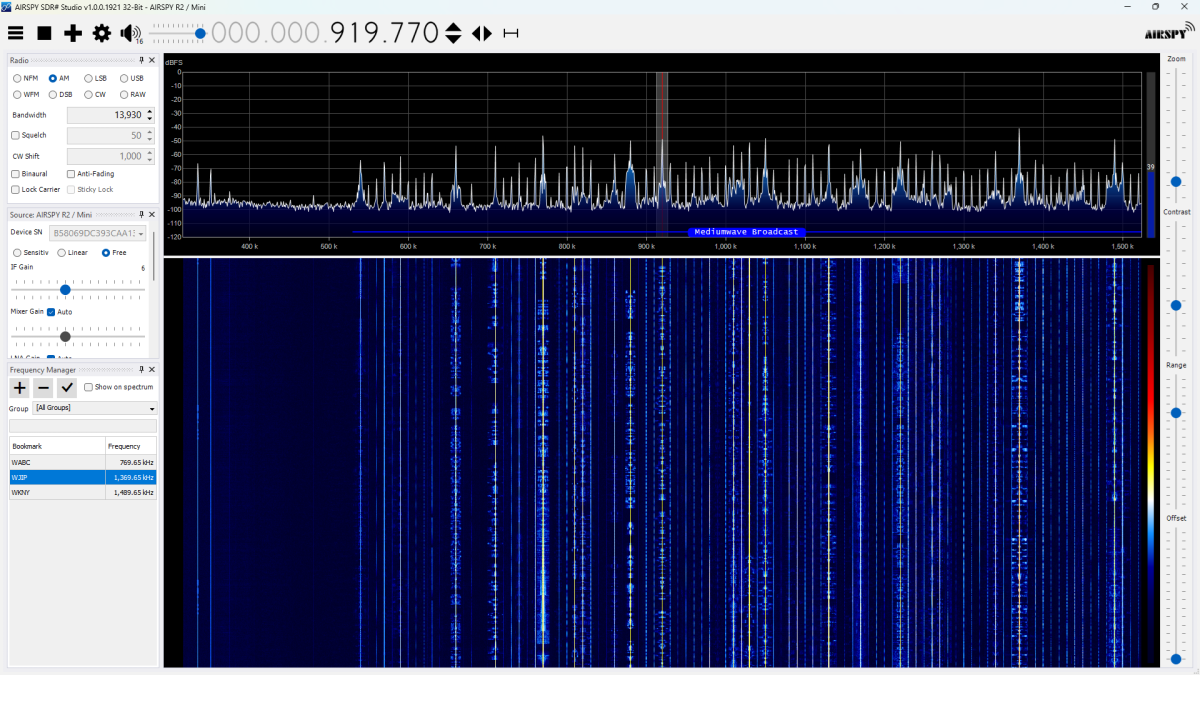
Wide view of the entire AM band, about 1pm

One of the reasons for the “decline of AM;” overcrowding. This was taken during the daytime, when there was no skywave propagation. Barely an open frequency.

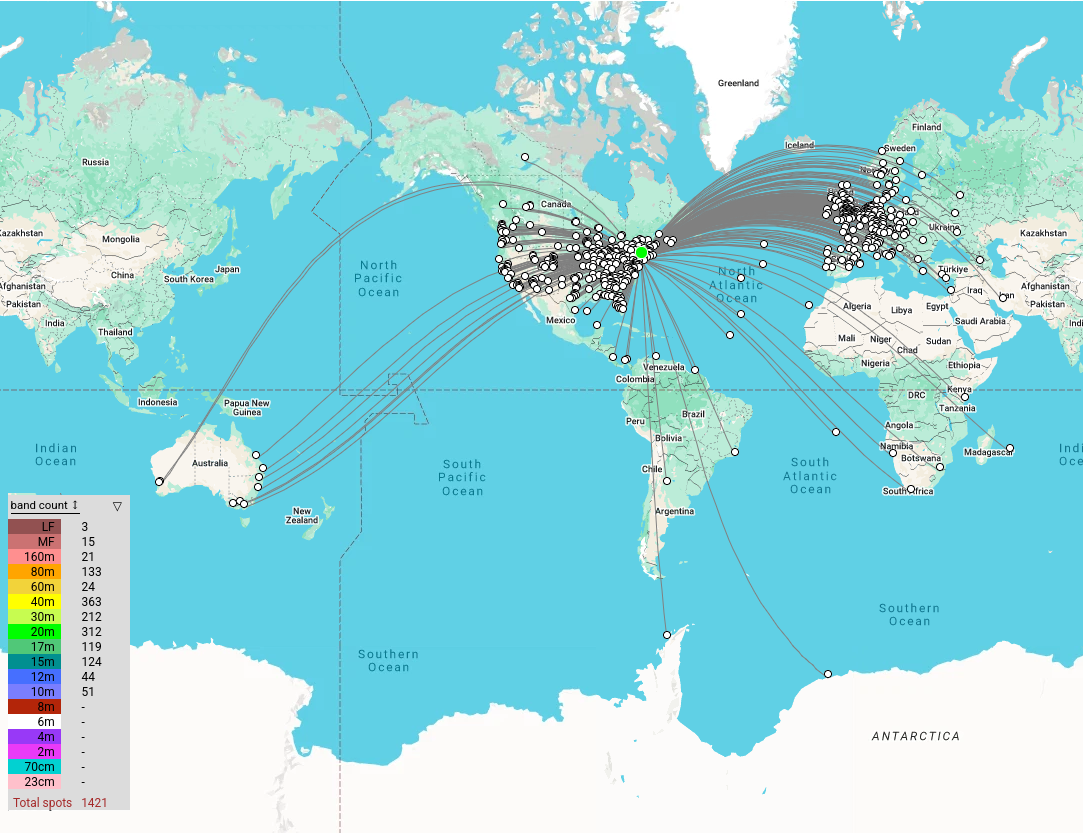
With the spectrum analyzer and made a few interesting discoveries. First, the noise floor in the Medium Frequency range goes from about -100 to -110 depending on the frequency. The noise floor on High Frequency is -112 or lower across the entire band. I clearly get all of the NYC AM stations as well as most of the stations in and around Albany. Before sunrise, I tuned around the 630 (472 to 479 KHz) meter band and heard a few stations sending CW (W4TS @ 164 miles (264 KM), K2ORS @ 157.2 miles (253 KM)). A few overnights of WSPR monitoring on 475.6 KHz netted 194 spots from 11 different stations. The furthest was 822 miles (1,322 KM) away in central Illinois. All of these stations are transmitting 5 watts EIRP or less.

LLOG 24 Hour WSPR/FST4W reception map; 33,592 spots, 1,421 unique

This antenna works well to about 15 MHz, where the signals start to drop off because of the transformer material that I used.

Using the Network Analyzer, I found the resonance is 2.865 MHz with a -36 dB return loss. This makes sense, as the wire laying on the ground will have a lower velocity factor due to the capacitive coupling with the earth. In this case the VF of the antenna is 73% when the soil is dry. The velocity factor should go down when the ground gets wet, or covered with snow.

It might be interesting to do some ground conductivity measurements…

I Audited the RF Noise in my House

The largest problem facing analog AM broadcasting (and digital Medium Frequency and High Frequency broadcasting) is RF Noise.

Like most people, I have many modern conveniences that make my life easier than previous generations; electric lights, central heat and air conditioning, appliances like vacuum cleaners, microwave ovens, and whatnot. I enjoy the wireless internet, have an LED TV, use LED light bulbs, and get free electricity from my photovoltaic solar system. These devices can contribute to the high levels of RF noise found in most buildings. RF Noise which is the bain of AM broadcasting. Digital modulation schemes use variations in amplitude to transmit data bits. They are not immune to RF noise, they simply mask it better until they don’t.

I thought it would be interesting to isolate the various noise generators that may be present.

To make measurements, I used the Siglent SVA-1032X spectrum analyzer. This unit has a noise floor of -140 dB. My methodology is to turn everything off except the Device Under Test. Set the spectrum analyzer up for a wide band sweep, then narrow the bandwidth on any detected noise. Turn the DUT off to make sure that the noise goes away. Turn the DUT back on to make sure that the noise comes back.

The first thing I noticed; there is more noise during the daylight hours than at night. This is interesting. I thought it might be coming from my solar system, which uses individual inverters for each panel (so-called microinverters). These are wired to 240 VAC but have an internet gateway device that is in the house and communicates with the inverters using a power line data scheme. It turns out this was a minor contributor below the AM broadcast band.

By process of elimination, here are things that were not contributing to RF noise on Medium Frequency (AM band):

  • Cable Modem (Motorola MB7420 DOCSIS 3.0)
  • Router/WiFi gateway* (Netgear R6700v2)
  • GB Ethernet Switch (Netgear TLSG116E)
  • Dell Desktop PC’s (three models)
  • Dell Laptop PC (two models)
  • Android phones (two models)*
  • Phillips 4K LED large-screen TV (5PFL5604/F7)
  • LG LED computer monitor (24MK430H-B)
  • Refrigerator (Frigidaire FFTR1835VSD)
  • Stove (GE BP63D W1WH)
  • LG washing machine (WM3400CW)
  • LG clothes dryer (DLEX4501)
  • Bosch dishwasher (SGV68U53UC)
  • Dehumidifier (GE APEL70LTL1)
  • LED light bulbs (Sylvania 9W Ultra LED)
  • Generic incandescent light bulb
  • Furnace (fancy controller)
  • Furnace burner motor**

*These are intentional RF emitters

**The furnace burner motor made a small broadband RF signal on startup, likely the igniter which uses an electric arc. Once the unit was running, there was no further RF emissions noted.

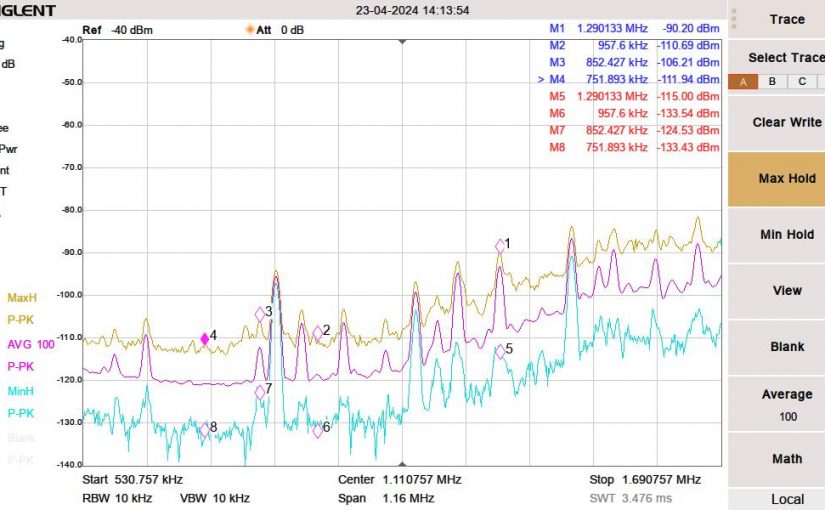
Medium Frequency baseline noise level

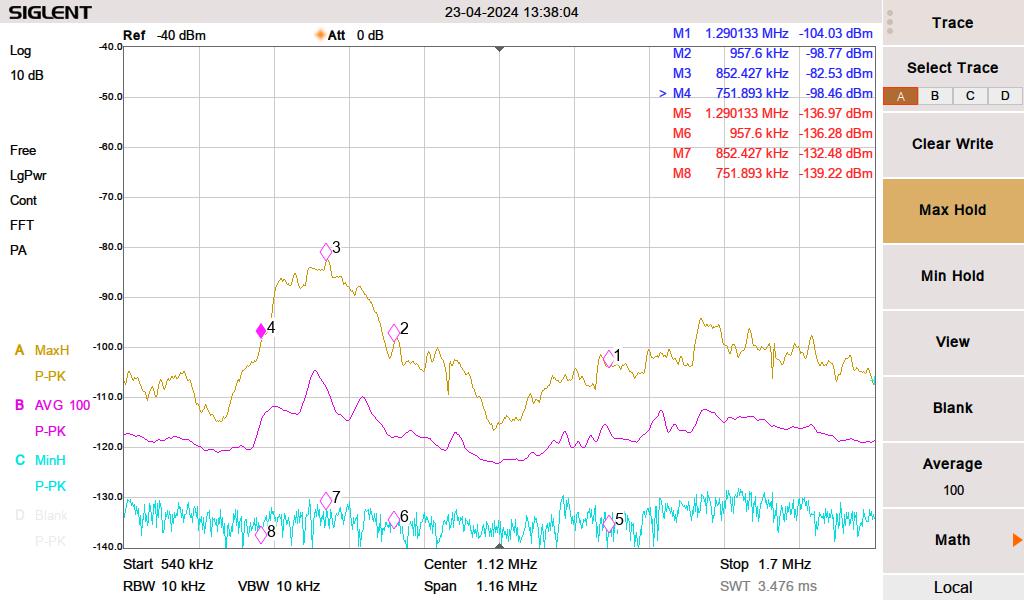
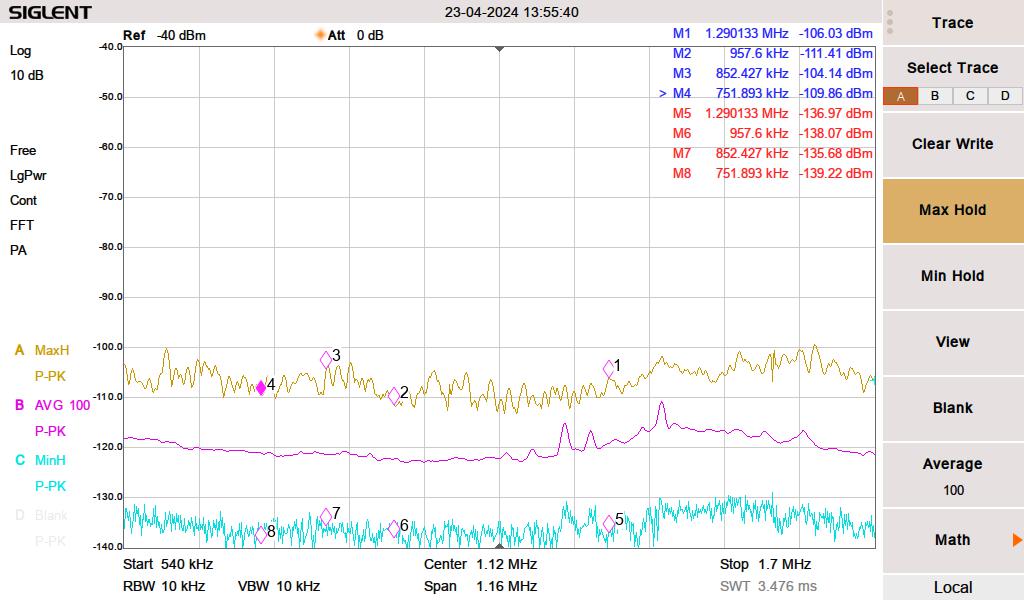
The yellow line is the peak hold, the magenta line is the 100 sweep average and the cyan line is the minimum peak hold. I live out in the sticks; there are no streetlights, no stoplights for miles, the nearest cellphone site is four miles away, and houses are spaced far apart.

First, I measured the noise with everything turned off. I then turned things on one by one, noting any changes in the spectrum. For the list noted above, this is the way it looked.

These are a few things contributing to RF noise levels on the MF band.

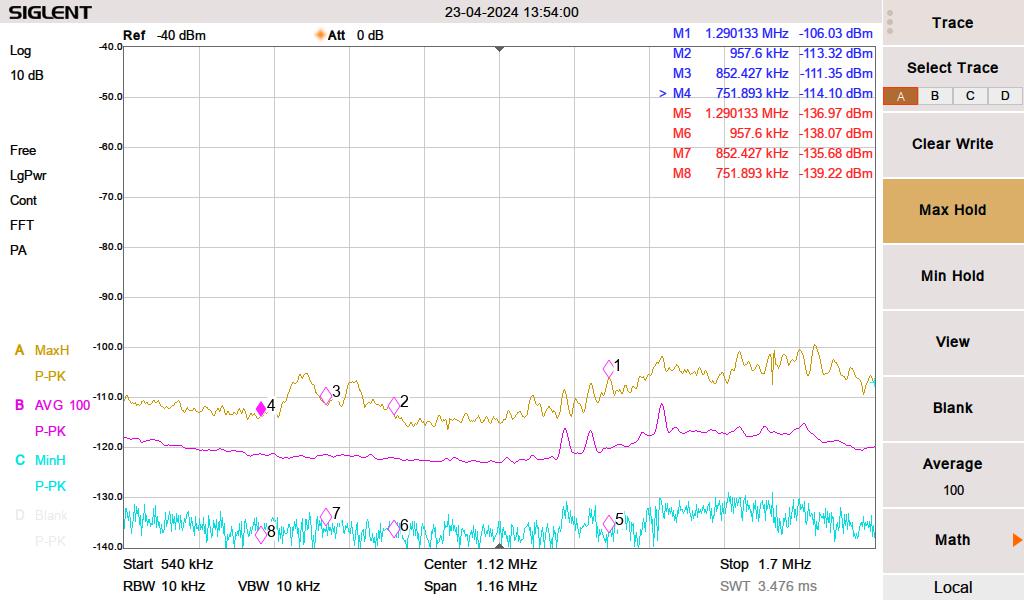
We have cheap Chinese grow lights to start seedlings for our vegetable garden. We were using these during the daytime hours to augment the low sunlight in early spring. I initially thought this was coming from the solar system. The interference was making a massive noise hump between 750 and 957 KHz. The brand of growlight is BestVA B-1000 LED which was purchased from Amazon.

RF noise from Grow Light

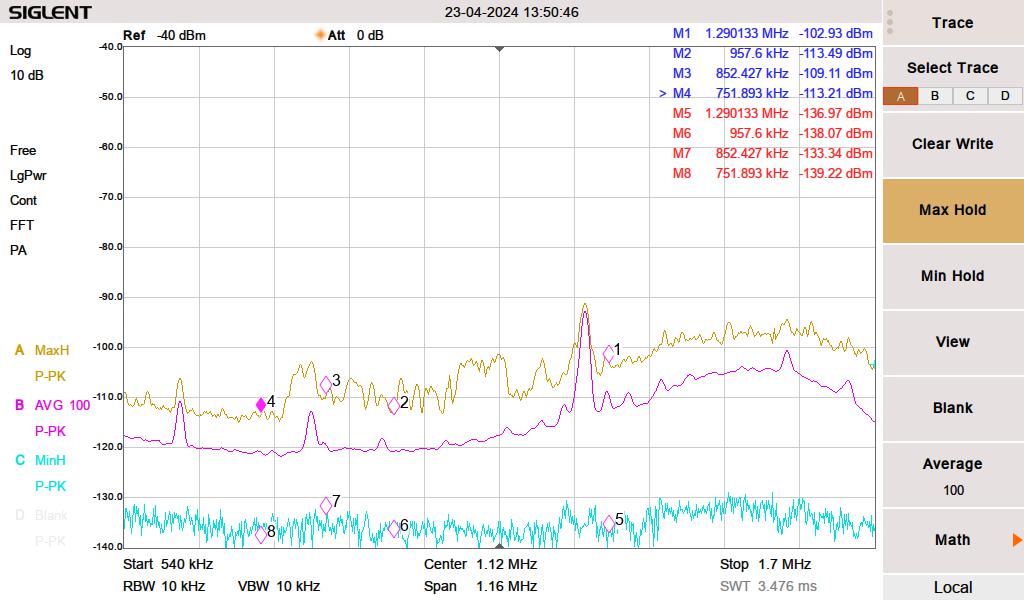
Next, somewhat surprisingly, the LG computer monitor on my desk was creating a pretty decent rise from 1120 KHz to 1700 KHz. I have three LG computer monitors, this is the newest only this one creates any RF noise.

LG 240P500 LED monitor

Then, pretty much every florescent lamp (compact or full-length tube) created a broadband noise increase across the entire MF band and well into HF.

Florescent lighting

The vacuum cleaner makes a little bit of broadband RF noise when near the receiver. However, you cannot hear the radio when the vacuum is running, so that does not seem to matter.

None of these are surprising. However, I was more surprised that many other electronic devices are not contributing to RF noise in my house.

A little bit about data over power line or power line communications. Searching for power line data can be a bit tricky. First, there is this large voltage 60 Hz (plus harmonics) waveform to deal with. Secondly, there are many different protocols and many different frequencies. I narrowed down my solar system by listening to my Kenwood R-2000 below 300 KHz. Some noise went away when I completely disconnected the inverters. I don’t know the exact frequency, the protocol, the modulation type, etc. But there is something.

Data Over Power line is popular with home automation systems, it can be used to extend Ethernet LAN, and some power companies are using it to control substation equipment, smart power meters, and/or to function as an ISP for their customers. I have heard some HF users complain about BBPL, but I have not experienced it for myself.