Emergency AM replacement antenna

Eventually, disaster will strike. It can range from a fire at the transmitter site to a tornado at the studio.  Someday, every station on the air will be knocked off at the worst possible moment. It is the law of nature.  Perhaps the most difficult disaster to recover from is the loss of a tower at a transmitter site.  An FM tower holds the antenna, therefore, finding a tower or building nearby and placing a temporary antenna there will get the station back on the air in a reasonable fashion.

An AM tower is the antenna, which is much harder to replicate.  One possible solution is to use a temporary wire antenna while the tower is being rebuilt.  This is allowed in FCC 73.1680 emergency antennas, provided the commission is notified of the situation by informal letter.  Directional stations must operate at 25% or less of the station’s licensed power, or demonstrate that radiation limits are not being exceeded in any direction.  That usually can be accomplished by taking a set of monitor points.

A wire antenna can come in several configurations:

  1. The fastest to deploy is the random-length end-fed wire.  This can normally be attached to the existing ATU and tuned up with components on hand.  It requires having an OIB, generator, and receiver to tune, which not every station has.  In addition to that, extra components may be needed in the ATU for tuning purposes.
  2. The next easiest is a tower-length wire ready to deploy.  This is a length of wire equal to the height of the tower, with insulators and supports.  The wire should be supported as high above ground as possible using trees, wooden poles, etc.  Still requires having an OIB, generator, and receiver to tune.  Likely to be within the tuning limits of the ATU components on hand.
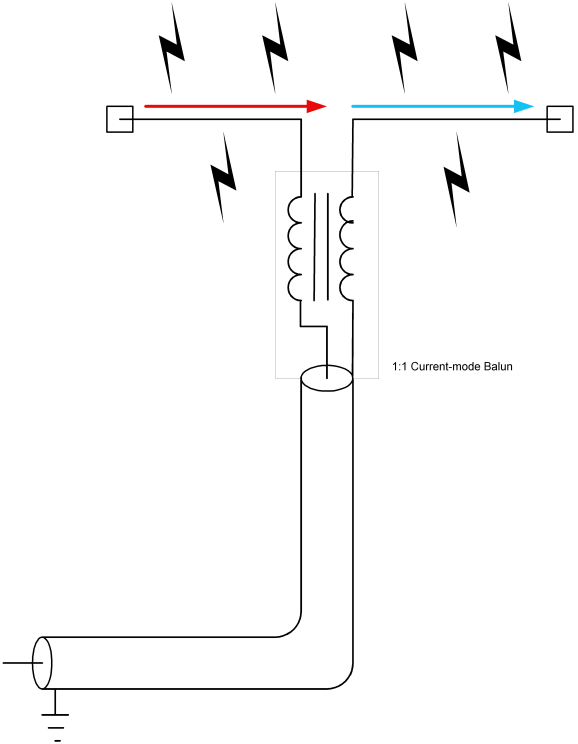
  3. A 1/2 wave dipole tuned for 50 ohms.  This can be connected directly to the transmitter output, thus is the best solution if the ATUs were damaged or otherwise not serviceable.  In this situation, two 1/4 wavelengths of wire are coupled at the center using a 1:1 balun.  Again, this antenna should be supported as high above ground as possible using trees, poles, and other non-conductive supports.  Can be installed in a V, inverted V, or L shape as required.

All three of these choices would likely limit transmitter power output to 1-2 KW.  Choice 3 likely represents the most efficient radiator and can be fabricated ahead of time and stored at the transmitter site.

1/2 wave dipole with 1:1 balun

To make a 1/2 wave dipole, cut two lengths of wire using the formula L(feet)=246/F(MHz).  This formula does not account for a velocity factor of 90%, which is typical for stranded wire.  The reason is, since an MF dipole antenna is necessarily going to be lower than 1/2 wavelength, it is better to start the antenna a little long and trim it to size for a 50-ohm impedance.  If commercially made insulators are not available, insulators can be made from non-conductive materials like PVC conduit, PEX, plexiglass, etc.  The insulators on the ends of the wire need to account for the voltage peak that will occur there.  If small “dogbone” type porcelain insulators are used, string three or four of them together using nylon or poly rope.  The insulator needs to be able to withstand 8-10 KW of power under full modulation.

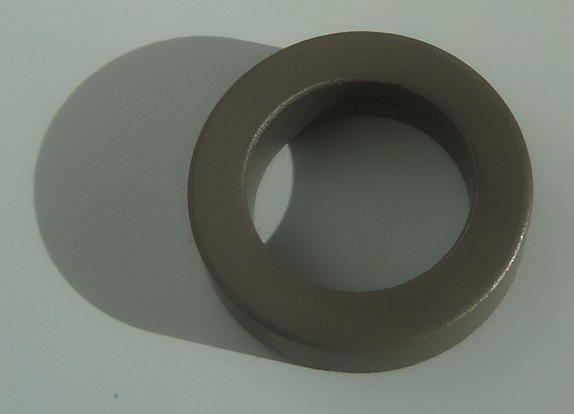
A 1:1 balun will distribute the RF currents evenly on both wires, which will help improve efficiency and coverage.  Most Ham Radio Baluns are not designed to work below 1.8 MHz and therefore, will not work for this purpose.  A balun can be made with a ferrite toroid made from 68, 73, 77, or type F material.  A good choice would be Amidon FT-290-77 or FT-290-F.  The type F material has a higher AL value, thus fewer turns are needed.  In addition to that, high voltage insulated wire should be used to wind the balun.

1/2 wave dipole antenna current voltage distribution

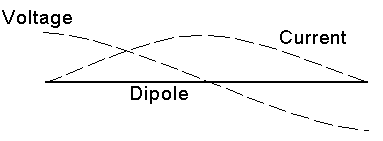
Since, in a 1/2 wave dipole configuration, the voltage is at a minimum at the center of the antenna, and current is at a maximum, some attention needs to be paid to wire size as well.

Amidon ferrite torroid core

To give a good idea of wire sizes required, some basic information is needed.  For a 1 KW station, it is assumed that the carrier will be modulated to 100 percent, therefore the peak envelope power will be 4 KW.  If the station is asymmetrically modulated, add another kilowatt.  Therefore, the maximum current formula is I=√(P/R).  P is the power in watts, or 5,000 and R is the radiation resistance or 50 ohms, thus I=√(5000/50) or 10 amps.   The maximum voltage is E=√(P x R) or E=√ (5000 x 50) or 500 volts.  For a safety factor, multiplying these values by 1.5 is recommended.  That will likely account for any impedance differences due to ground proximity and so forth.  Therefore for a 1 KW station, the dipole antenna should be designed for 15 amps and 750 volts.

For a 2 KW station the peak envelope power for an asymmetrically modulated transmitter is 10 KW, thus it follows that 30 amps and 1500 volts are safe working figures.

With the proper torroid core, a turns count of 7-10 turns bifilar will suffice.  Since it is a 1:1 balun, the turns count on both sides of the transformer will be the same.  The balun then should be placed in a suitable water proof housing designed to be attached to the center of the dipole antenna.  This is a good example of a commercially available 5 KW 1:1 balun for amateur radio use:

1:1 balun designed for center of 1/2 wave dipole antenna

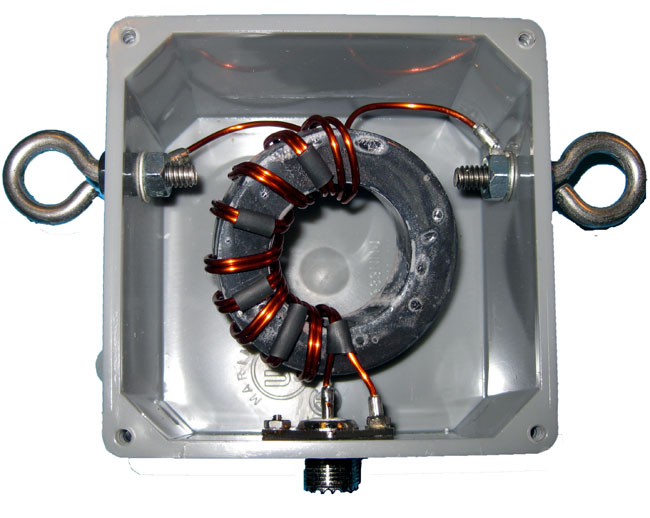
The antenna can be fed with RG-8, RG-8X, RG-8A, RG-214 or any other coax this is capable of handling the peak envelope power of the radio station.  The connector can be UHF, N, LC, etc.  In some cases, the may be easier to simply omit the connector and connect the coax to the balun using some type of strain relief on the cable coming out of the box.

Once this antenna is made, a bit of tuning may be required to bring it to 50 ohms.  This can be done with a bridge and generator, or with the transmitter on low power.  Either way, the measurements must be taken with the antenna at operating height as the distance to ground will effect the termination point impedance.  It may require some trial and error.

In all, a good backup antenna can be made for about $50-60 or so.  A little bit more if fancy transmission line is used.  Well worth the expense and effort to have something ready to go in a moment’s notice.

Update: I’ve been fooling around with this on EZNEC, it may not be that easy to do, especially with the lower frequencies in the AM band.  The antenna needs to be at least 0.06 wave length above ground to perform correctly.  Somewhat lower over better ground conductivity, e.g. ground radials.  Even at this height, it needs to be lengthened significantly to get the feed point impedance close to 50 ohms.

Mouser Mobile edition

Mouser Electronics has created a mobile web edition for its online store. This is a handy tool for searching, cross-referencing, and ordering parts.  Mouser has a large stock and they ship quickly.  Time once was that you could run down to the local electronics store and get just about anything you needed.  Even Radio Shack carried a fair amount of small parts, tools, connectors, and so on.  Since then, the local electronics shop has closed and Radio Shack’s inventory gets smaller every year.  Using a large parts supply company like Mouser or Allied is necessary if any type of troubleshooting and repair is undertaken.

I like the Mouser Mobile site because there is no app to download and install.  One simply points the web browser on any mobile device to mouser.com and it will automatically redirect to the mobile site.  If that does not work, then m.mouser.com will.   The mobile website is easy to browse around, and if needed, a quick call can be made by hitting the little phone icon.  Here is more in a video:

All is not well in Paradise

If one considers paradise an FM35A. Going through another iteration of blown transmitter fuses for WEBE, Bridgeport, CT. Yesterday, I spent the afternoon examining the transmitter and found several interesting things:

  1. Fresh arc tracks on the PA cavity and PA loading capacitor
  2. The shoes and bars in the high-voltage contactor were severely pitted
  3. One of the mains phases (middle) in the high voltage supply appears to be heating up, likely due to a loose connection.
Discolored wire on buss bar

I checked and re-tightened all of the mains connections.  Apparently, this is an old problem, as the Allen screw was tight.  Interestingly, the fuse that was blown was on the red phase, which is different from what it was last time.

I spent the afternoon filing and sanding off the arc track marks in the PA cavity.  It is very important to file flat all sharp points that were the result of arcing.  Any sharp points will induce corona.  I also filed down all of the contacts in a high voltage contactor, which took a fair amount of time. These are soft copper shoes and bars that had so much pitting and carbon I wonder how they didn’t catch on fire.  I filed them flat.  We were back on the 35A transmitter at full power by 4:30 pm.

If this happens again, I will bring my megger out and check the insulation on the wire between the disconnect switch and the HV power supply.

When I left the site at 5:30, I felt like we did some good work.

Lightning Season

The rumble of thunder this morning let me know that lightning season is upon us here in the Northeast and likely the rest of the country as well.  I used to enjoy the odd summer thunderstorm, especially the late afternoon pop-ups that cool off a hot summer’s day.  Now whenever I see lightning or hear thunder I wonder if the phone is going to ring.  Chances are good that it will not, as I invested many hours of my time and my previous employer’s money into lightning protection at the transmitter sites.

upper atmosphere lightning depiction

I go on the assumption that all tall steel towers will get struck, oftentimes repeatedly, during any particular electrical storm.  Back in the day, I took a course by Polyphaser called “The Grounds for Lightning and EMP Protection.”  It was a great primer on how to ground and bond equipment at a transmitter site to eliminate current flow, which is the cause of all EMP and lightning-induced failures. When I was in military communications, no expense was spared as they took uptime very seriously.  Any downtime was a personal affront to the commanding officer of the unit in question.

Lightning is DC however, it behaves more like 10 KHz – 2 MHz AC.  Therefore, lightning and EMP grounding systems need to be designed and installed to accommodate DC through 10 KHz AC voltages.  This is easily done by choosing the correct conductors, ground bus bars, and bonding systems.

The other path lighting takes into a transmitter is through the AC mains.  Utility company high voltage primary feeds act like large antennas for lightning-induced EMP.  Fortunately, much of that is filtered out by the step-down transformers just before the building service entrance.  It is still possible, however, for some impulse voltage to make it through the transformers and into the service entrance panel.  On older tube type transmitters, this could often damage the plate voltage power supply because of the voltage multiplication factor of the plate transformer.  Oftentimes, the transformer secondary would have “holes” punched through the insulation to ground.  This is an expensive and time-consuming repair.

I would conservatively estimate that for every $10.00 spent on lightning protection, $1,000.00 dollars worth of damage and downtime is saved.  Overall, a pretty good return on investment.

The basics for lightning ground bonding are thus:

  • Use the lowest inductance wire possible.  The industry standard is #2 solid copper, however, if bonded properly, there will be very little current flow inside the transmitter building, so if #2 is not available, then any solid wire up to #8 will work.  Tower ground bonding should be as heavy as possible.
  • Ground all guy anchor points, and bond all guy wires together and to the same ground rod or ground rod system.
  • Keep the bonding conductors as straight as possible, bends should be long sweeping turns to minimize series inductance.
  • All metal equipment should be bonded, no rack, telco demark, electrical panel, dummy load, bulkhead entrance grounding bus, combiner, door frame, etc should be left unbonded.
  • All coax outer shields should be grounded where it comes into the building.
  • All coax cables should go through a toroid before being connected to the transmitter.
  • All outdoor bonding connections should be exothermically (CAD welded) bonded to ground rods.
  • All grounding must go to a common ground point, AKA star grounding point.  No individual ground points should be allowed in the building.
  • Multiple ground rods were installed around the outside perimeter of the building as deeply as possible.  Some mountaintop transmitter sites may require special grounding material (Bentonite) and or to have a ground well drilled.  Ground conductors should have as much surface area contact with Earth as possible.

The whole idea is to present a low-resistance ground path and keep all of the equipment at the same potential to minimize the current flow between equipment.

For the electrical building service entrance, a series surge protector installed before the service panel is the best method.  Several are made and they need to be sized for the building service.  A fallback is a parallel surge protector that will provide some protection.  On the AC mains connections, any series inductance that can be added to increase resistance to the lightning pulse is good.   All AC mains connections to the transmitter should go through a toroid before they are connected to the transmitter.  This is a good idea for remote control and mod monitor wiring as well.